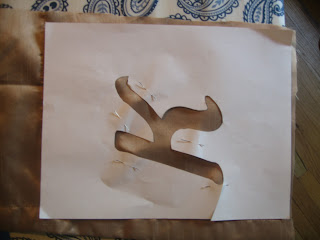
Here's how I did it...
Step 1 - Find/make an initial of the appropriate size for your monogram. I used Word and played with every font I own (and some new ones) to find a typeface that I liked. Nope, I have no idea what it was because sadly, I forgot to save it :(
Step 2 - Print out initial onto paper (alternately, you could also trace an initial onto paper if you happen to have some wooden/cardboard/metal letters lying around)
Step 3 - Buy a lovely background fabric. I used silk for this project, but anything that doesn't pucker would work beautifully. Cut the fabric to your desired size (my finished project was 8x10) and press it well.
Step 4 - Buy lots and lots of buttons in varying sizes and styles. Lots.
Step 5 - Carefully cut out the monogram from the paper (OR for you lucky cricuters...just cricut the monogram and save yourself a step) and pin the cut (negative) paper onto your background fabric
Step 6 - Tape your cut image to a work surface (I used a pan from the dollar store)
Step 7 - Using your cut monogram as a guide, start building your button monogram. I layed out the complete monogram before putting needle to fabric (because I'm anal particular like that)
Step 8 - Using your pinned monogram negative, sew each button on...button by pretty little button
Step 9 - Cut your background fabric to size and frame your craft of art :)


