Showing posts with label wedding crafts. Show all posts

Thursday, September 30, 2010

Button Button, Who Framed the Button!

Happy Thursday!!  Well finally I have another craft to share :)  I wanted to make my sister and new brother-in-law something special for a wedding gift.  I bookmarked every wedding craft I came across, but ultimately I decided to go with something a little more timeless.  The one thing that I kept coming back to was a monogram - but what medium to go with?  Buttons (obviously!)  I've seen lots of gorgeous button-monogrammed pillows, but I was afraid that their playful pup might get ahold of it (and bye bye wedding gift).  So instead, I came up with this framed button monogram.  Same concept, but puppy proof :)


Here's how I did it...

Step 1 - Find/make an initial of the appropriate size for your monogram.  I used Word and played with every font I own (and some new ones) to find a typeface that I liked.  Nope, I have no idea what it was because sadly, I forgot to save it :(

Step 2 - Print out initial onto paper (alternately, you could also trace an initial onto paper if you happen to have some wooden/cardboard/metal letters lying around)

Step 3 - Buy a lovely background fabric.  I used silk for this project, but anything that doesn't pucker would work beautifully.  Cut the fabric to your desired size (my finished project was 8x10) and press it well.

Step 4 - Buy lots and lots of buttons in varying sizes and styles.  Lots.

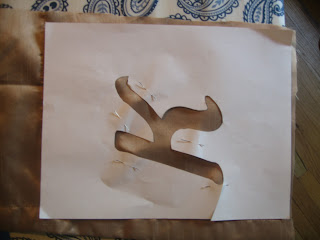
Step 5 - Carefully cut out the monogram from the paper (OR for you lucky cricuters...just cricut the monogram and save yourself a step) and pin the cut (negative) paper onto your background fabric


Step 6 - Tape your cut image to a work surface (I used a pan from the dollar store)

Step 7 - Using your cut monogram as a guide, start building your button monogram.  I layed out the complete monogram before putting needle to fabric (because I'm anal particular like that)


Step 8 - Using your pinned monogram negative, sew each button on...button by pretty little button


Step 9 - Cut your background fabric to size and frame your craft of art :)


Thursday, August 5, 2010

Wedding Card Gazebo

Happy Thursday!!  My sister's wedding is tomorrow and I've been a teensy bit busy over here baking cookies (we have full-on cookie tables at our weddings) and making some gifts for the soon-to-be-mr-and-mrs.  Since I can't show the gifties yet, here's a peek of the decorated card gazebo (yes, card gazebo)


The gazebo is pretty on it's own, but since everything else is going to be decked out, why not gussy it up too.  I started with the gazebo, tulle on a roll, a nifty LED wired floral spray and a silk hydrangea bush.  I found the LED lights in the floral section of Jo Anns.  According to the packaging, they're meant to be added to silk vase arrangements.  Maybe it's just me, but I think that's kinda odd - when was the last time that you had a floral arrangement come with lights?  But anyway, I liked that the lights are battery powered and figured that I could do something with them.  And after playing with them a little, I thought they'd look lovely going around the gazebo, softened with a bit of tulle.  Here's how the decorating was done...


Bend the LED light spray into a crown/halo shape and use the tulle to bind it to the gazebo - go around twice with the tulle to really soften the lights and create a bit of pouf


Insert ugly green battery case into a standard white jewlery box (the kind you get when buying earrings or bracelets at a department store) to hide the ugly green-ness


Tie the ends of the tulle (used in step 1) into a pretty poufy bow


Hot glue three hydrangea sections onto the gazebo above the door and add a little tulle pouf to the very top (I forgot to take pictures of this part - I simply cannot hot glue and operate a camera at the same time).


Stand back and admire your work :)  I like this so much that I'm trying to find a spot in my house to put one.  I'm thinking a Halloween one would be fantastic - imgine black tulle.. orange lights..  I feel another project coming on ;)

Thursday, July 15, 2010

Pretty Paper Decor

Happy Thursday!  This past weekend we hosted a bridal shower for my SIL at our house.  My in-law's family is on the small side, so it was an intimate party held outside under the shade of our ancient silver maple (well most of it was in the shade!)  This is the hubs only sister and my MIL went all out with a pink & girly theme.  There were dish rag bikini's, big tissue paper flowers (ala Miss Martha) and a completely decorated chair of honor.  My contribution to the decor (aside from cleaning like whirling dervish and impromptu landscaping), were some paper napkin flowers and these lovely paper doily garlands:


There are really only two three steps to the process:
1 - Fold all the doilies in half
2 - Use dots of hot glue to attach them to a length of ribbon
3 - Fold over each end  of the ribbon and hot glue down to provide additional stability for hanging.  This is a totally optional step, but I wanted to be able to hang the garland from my dining room hutch with another length of ribbon like so:

They are incredibly simple to make and I absolutely love how sweet and delicate they are :)


And here are a few more pictures (because I can't help myself!)

I used thumb tacks to hold them in place outside

Yes, he did attend the shower (he wanted to be 'out with the ladies')

Here's a table shot - aren't those tissue paper flowers gorgeous!

Thursday, April 22, 2010

106 More Days...

...till my sister gets married!!  Her shower is coming up in a few months, but I just couldn't wait to give her a little something.  When I was waiting for my wedding day, I loved having a countdown calendar.  Since a 100+ day countdown calendar seemed like it would be a little, um, huge.  So I turned to my oh-so-awesome can of chalkboard paint :)

I picked up a small wooden plaque and sprayed it with 4 coats of chalkboard paint


Then I rounded up (ok, I mostly went out and bought) some pretty, sparkly ribbon in shades of white, silver and cream


I created a strip of rag garland using all that sparkly ribbon and some strips of white and cream cotton fabric to give it tons of fluffiness.  To assemble, I just used my staple gun to adhere the rag garland handle to the back and viola...wedding countdown chalkboard:


I liked this lil hanging chalkboard so much that I've got a few more in the works...and I'm offering one of them up for my first eva giveaway!  On Saturday, I'm going to use my nifty random generator to pull one of my (amazingly awesome!) followers. 

LinkWithin

Related Posts with Thumbnails