Friday, April 30, 2010

Yummy Summer Salad

Now that the weather is nice enough for regular grilling, I find myself looking for tasty salads to serve alongside the platters of grilled deliciousness.  Here are two of my go-to favorites...


Fresh Tomato Salad
3-4 medium tomatoes, chopped
1/2 medium sweet onion, chopped fine
1/2 cup Red Pepper Vinagrette
Fresh cracked pepper, to taste
  1. Mix tomatoes, onion and dressing together
  2. Add freshly cracked pepper
  3. Dig in to a big bite of summer


Spring Potato Salad
4 large potatoes, peeled and cubed
1 packet Good Seasons Italian Dressing
1/2 cup white wine vinegar
1/2 cup olive oil
2 tablespoons water
1 teaspoon Dijon mustard
1/2 medium red onion, chopped fine
3-4 radishes, sliced thin

  1. Bring large pot of water to a full boil, add potato cubes and boil for 20 minutes (after 20 minutes, check potato for doneness - continue to boil if not completely cooked through)
  2. While potatoes are boiling, wisk dressing mix with vinegar, water, olive oil and mustard
  3. Drain potatoes and toss with red onion, radishes and prepared dressing
  4. Mix well and chill until serving

Thursday, April 29, 2010

Pretty Lil Magnet

Happy Thursday!  A few weeks ago, I picked up a few of these magnets at JoAnn's for $.50 a piece.  I think that they're cute as is, but I like to burlap the lily (hey, you say gild, I say burlap).  And yes, I bought a few.  Yes, I have a craft-supply shopping addiction. 

Here's the magnet hanging out with all the little scrap fabric that I'm going to use for the embellishment

I happened upon this magnet again yesterday and thought, 'hmm, I have a lovely tin planter just waiting for a sweet magnet like this'  Yep, I have wacky conversations in my head.  So I rounded up some scrap fabric, tied a little rag embellishment and hot glued said embellishment to aforementioned magnet.  Done and done.  Oh right, first slap magnet onto tin planter and then done.


It's a little cutesy, but I like it :)  And not bad for 50 cents (hmm, whatever happened to 50 cent?  Can I still find him in the club?)

Wednesday, April 28, 2010

Pillows for My Boys

Happy Wednesday!  Woo Hoo my bookcases are finished.  Well, they're built and painted, but I still have some crafting and shopping to do before I'm ready to reveal them (they want to look they're best!).  So instead, here's what I was working on while the hubs and my lil tool guy were finishing up the bookcases:


Yes, that is a peek at the bookcase (I'm such a tease).  Both the hubster and the Stinkerpoo love to lay on the floor, wrestle on the floor, nap on the floor (ok, that's the hubs) - you get the picture.  I'm always yelling at them asking them nicely to quit using my pretty pillows as weapons/wrestling dummies/drool catchers.  So I decided to make them some big floor-type pillows.  I bought 4 cheap bed pillows at Walmart and a few yards of this lovely beige ticking.  A few hours with my iron and sewing machine and the boys have some pillows that they can call their own.  Although, now that I look at them... they almost look too pretty to use ;)

Tuesday, April 27, 2010

Resizing Your Blog-Love Buttons

Happy Tuesday!!  A few weeks ago I switched my linky party buttons from on each individual post to my blog sidebar.  Once I had all of my party buttons moved, they looked a little cluttered - different sizes and a little big for the space.  Soooo I did what any HTML lovin girl would do, I resized them to a more uniform size.  It's incredibly easy & anyone can do it!  Here's what I did...

Go into your Blogger Layout tab and decide where you would like the list of buttons to appear (in my case it was the left column), and select the [Add a Gadget] button:


Pick the Text Gadget from the pop-up list of basic gadgets:


Enter the title of your list (for this example I'm building my list of favorite blogs) and enter any separating titles in the main body (since this is a favs list, I'm separating by type):


Now for the fun (and really, the most time consuming) part, building out the list of buttons.  I had a mishmash of button links scattered throughout all of my posts.  I just sat down over a few days and slowly copied them one by one into a Notepad txt file so that I would have my list all together.  Toggle to the HTML view by selecting the Edit HTML link on the far right, under the Title (circled by red in the previous picture).  For this example, I only have one button:

A quick note, if your button link has a center tag and you would rather the buttons be left justified, simply remove the center tag and it's matching /center tag.


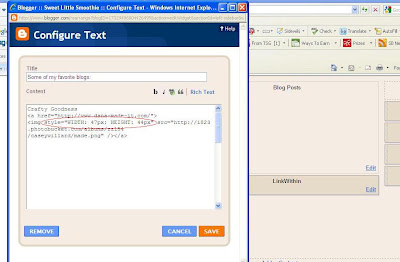
Now for the simple adjustment - all you need to do is add (or possibly change) a height and width size.  First step is to look for an existing height and/or width specification in the tag.  If one exists, all you'll need to do is alter the numbers.  If not, you simply need to copy in this style="WIDTH: 47px; HEIGHT: 44px"  I used 47 pixels wide by 44 pixels high.  I found it to be the size that worked well with most of my button collection.  You can fiddle with the height and width until you are satisfied with the dimentions:


To view what the button will look like on your page, simply toggle back to the Rich Text view:


And here's what my button looks like on my blog:

(and seriously, who does not love Dana @ MADE?!?)

For any new link up parties, I simply edit the Gadget, add the new button and edit the height & width size...easy peasy :)

Monday, April 26, 2010

Rawr Dinosaur!

Happy Monday!  My little guy LOVES dinosaurs so it is really high time that we have a dinosaur themed week!  His love of dinosaurs started with the song 'We Are the Dinosaurs' by the Laurie Berkner Band we he was only 18 months and it has been full blown love ever since.  Here are the Roar-tivities that we have planned for this week:

 
Letter of the Week: D
Crafty Creative Sensory Fun:

  • D is for Dinosaur Letter Craft
  • Dino Matching Memory Game
  • Homemade Dinosaur Eggs
  • Dinosaur Tail for dress up
  • Dino Dig (in the back yard)
Books:
Songs:
  • We are the Dinosaurs
Saturday Movie:
  • Ice Age: Dawn of the Dinosaurs 

For more Munchkin Fun (or to see posts on our activities this week), stomp on over to Sweet Little Munckin :)

Saturday, April 24, 2010

And the Winner Is...

First off I want to say THANK YOU!!! to everyone following this here blog! It's so awesome to have a place to share crafty ideas and be inspired by all of the creativity out there in bloggyland!


As promised, I used my adorable random generator (aka, Munchkin) to pull the winner of the hanging chalkboard....


And the winner is Ashley! Congratultions :) Please send me an email at SweetLittleSmoothie(at)gmail(dot)com to claim your chalkboard.

Friday, April 23, 2010

Smothered BBQ Chicken with Grilled Potatoes

Now that the weather is heating up, we'll be doing alot of grilling (and by we, I mean the hubs). This is one of our favorite Aussie restaurant-inspired grilled dinners: Smothered BBQ Chicken w/ Grilled Potatoes and a cool salad


Smothered BBQ Chicken with Grilled Potatoes and Tomato Salad
BBQ Chicken Ingredients
6 boneless, skinless chicken breasts, rinsed and trimmed
6 slices bacon, cooked and cut into halves
1 cup shredded monterey jack cheese
1 cup of your favorite BBQ Sauce

Grilled Potato Ingredients
4 medium potatoes
1/4 sweet onion, chopped fine
2 slices bacon, cooked and crumbled
1/2 cup shredded monterey jack or pepper-jack cheese
2 teaspoons pepper
1 teaspoon salt
1 teaspoon garlic powder
olive oil


Salad Ingredients:
2 cups mixed lettuce, chopped
1 small carrot, shredded
1 fresh tomato, chopped
1/4 cup sweet onion or red onion, chopped fine
2-3 springs fresh dill
Ranch dressing

 Directions:
  1. Preheat grill to medium-high
  2. Wash the potatoes
  3. Combine the salt, pepper and garlic powder
  4. Rub each potato with a little olive oil and then sprinkle with salt & pepper
  5. Cut each potato in half lengthwise
  6. Put the potato halves on the grill, cut side down
  7. While the potatoes are grilling, toss salad ingredients together
  8. Put chicken on the grill and baste with BBQ sauce
  9. Flip the potatoes after 20 and grill for an additional 10 minutes
  10. Flip the chicken after 7, baste with more BBQ sauce
  11. Continue to flip and baste the chicken every 10 minutes until fully cooked
To assemble:
  1. Arrange two bacon strip halves in an X on top of each chicken breast; top with approximately 2 tablespoons shredded cheese
  2. Sprinkle approximately 1 tablespoon of cheese onto each potato half; top with approximately 1 teaspoon onion, 1 teaspoon crumbled bacon and another 1 tablespoon of shredded cheese

Thursday, April 22, 2010

106 More Days...

...till my sister gets married!!  Her shower is coming up in a few months, but I just couldn't wait to give her a little something.  When I was waiting for my wedding day, I loved having a countdown calendar.  Since a 100+ day countdown calendar seemed like it would be a little, um, huge.  So I turned to my oh-so-awesome can of chalkboard paint :)

I picked up a small wooden plaque and sprayed it with 4 coats of chalkboard paint


Then I rounded up (ok, I mostly went out and bought) some pretty, sparkly ribbon in shades of white, silver and cream


I created a strip of rag garland using all that sparkly ribbon and some strips of white and cream cotton fabric to give it tons of fluffiness.  To assemble, I just used my staple gun to adhere the rag garland handle to the back and viola...wedding countdown chalkboard:


I liked this lil hanging chalkboard so much that I've got a few more in the works...and I'm offering one of them up for my first eva giveaway!  On Saturday, I'm going to use my nifty random generator to pull one of my (amazingly awesome!) followers. 

Wednesday, April 21, 2010

Teensy Bit of Summer Decor

Happy Wednesday!  Today's Whateva is my newest bit of home decor.  Now, I'm a craftaholic by nature, but my crafting is going into high gear.  Spring has sprung, summer is a comin - and I have almost no fun summer decor.  And, of course, I'm ALWAYS coming across awesome new things to try and having crafty ideas wake me up at night (seriously, is this just me?)  If that's not enough of a reason to craft till the cows come home, the hubs is building me gorgeous bookcases on either side of our fireplace {swoon} and I'm going to have to fill these beauties up.  I've been working on a bunch of big projects (well, big for me) and I needed a bit of instant gratification.  I raided my always plentiful stash of craft supplies and came up with a little Dollar Store frame, some craft paint, a few pieces of scrap scrapbook paper and a little ribbon flower:
(ignore the egg carton - I used it to balance the frame while I painted it)

I painted the hideous less than awesome frame with two coats of this lovely aqua craft paint.  While that was drying I test drove a bunch of different color combos of the scrapbook paper and settled on this pretty mustard (it has a hint of an argyle pattern) for the background and a summery floral for the accent round (I just used a simple fluted-round paper cutter).  Then it was just a matter of hot gluing the flower to the accent round and then that onto the background paper.  Frame it up and call it done :)


What's that?  You'd like to see an action shot?  Well sure!  Here she is on my tray redux posing with a few other makeover vixens.  I love the way the color pops against the other cream accessories...


Oh and you also want a sneak peek of those bookcases?  I thought you'd never ask :)

Please ignore all the chaos going on in this picture - lots of projects = no time for straightening up!

Tuesday, April 20, 2010

Hours of Preschooler Fun

Happy Tuesday!  Today's tip is a toy.  A toy, you ask?  Last week, my awesome friend S bought Sir Stinkypoo this hide-and-go-seek egg:


I wasn't quite sure that Munchkin would have the patience to play 'find the egg'.  After all, my Tasmanian Devil typically whirls through his toys in about 6.2 seconds.  I.Was.Wrong.  I opened it up for him on Staurday morning and we've already logged at least 3 hours of egg hunting fun!  He LOVES finding the egg - I think it might be the challenge that he loves so much (um..light bulb, Mom).  The ever-changing hiding spot keeps things interesting.  And adding to the fun, the adorable little egg talks every 5-10 seconds, saying things like 'Yoohoo, I'm over here!' or 'I'm hiding'.  He is SO proud of himself when he finds it.  Thank you, S, for your amazing thoughtfulness! 

In case anyone is interested in these eggs, they're made by Techno Source and you can buy them here.

Monday, April 19, 2010

Earth Week

Happy Monday!  In honor of Earth Day on Thursday, this week's Munchkin Theme is focused on all things green.  I've introduced the concept of recycling and repurposing over the past few weeks, so this week we'll be building on that base.  Here's what we'll be up to this week:

Letter of the Week: E
Crafty Creative Sensory Fun:
  • E is for Earth
  • Egg Carton Flowers
  • Milk Carton Bird Feeder
  • Earth Finger Painting
  • Seed Planting
Books:

Food Fun:

For more Munckin Fun (or to see posts on the afore mentioned activites), scoot on over to Sweet Little Munchkin :)

Friday, April 16, 2010

Yummy Fried Rice

Fried rice is one my guilty pleasures.  Fortunately, the hubs does not share my love (for the fried rice that is) so one batch means yummy lunches for a week :)  Here's my favorite fried rice recipe.  It is ridiculously easy and so yummy!


Yummy Fried Rice

1 cup white rice (not instant or quick rice)
2 eggs, beaten
1 cup frozen peas, thawed
2 tablespoons finely grated carrot
1 small onion
1/2 cup fresh mushrooms, sliced
1 1/2 tablespoons butter
2 tablespoons soy sauce (or to taste)
salt & pepper

  1. Cook the rice according to the instructions on the package (approximately 20 minutes).  Once cooked, set aside to cool
  2. While rice is cooking, scramble the eggs either in a small pan or in the microwave.  Chop the scrambled egg into small pea-sized bits
  3. Melt butter in large frying pan over medium-high heat
  4. Add rice, peas, carrot, onion, mushrooms, egg and soy sauce to the frying pan; add a dash of salt & pepper to taste
  5. Cook over medium-high heat for 6-8 minutes, stirring often

Thursday, April 15, 2010

This Little Piggy...

...got covered in Chalkboard paint and is so cute :)  I've been seeing alot of numbered items out there.  I love things with numbers on them.  I love things with letters on them.  I even love fonts (really, is it weird to love fonts?)  Here's my slightly whimsical take on numbered cuties:


I picked up 3 little piggy banks from the Dollar Store - here's what they looked like before


Then I just coated them in a few layers of plain old black paint and then another two thin layers of chalkboard paint (I really love the super matte look of chalkboard paint!) 


The numbers are written stenciled in chalk.  I thought I'd go with something a little prettier than my own handwriting.  Since a Cricut is still on my wish list, I just printed out the numbers onto plain paper.  Then I cut them out (with scissors no less) and used the stencil to chalk on the numbers.  I am loving these 3 little pigs!  Now I just have to find a home for them in the my little Piglet's room :)

Wednesday, April 14, 2010

'Quilted' Paper Alphabet

Helloooo Wednesday!  Today's Whateva is something that hangs in my little Stinker's room and is my absolute proudest crafting accomplishment:


This, my virtual friends, is what I call a 'Quilted' Paper Alphabet.  It was conceived out of one of my pregnant woman, wildly vivid dreams of a dancing alphabet (seriously - what causes those wacky dreams?!?).  I worked on it for months.  I hand cut everything.  I made my own patterns.  I was a crazy pregnant woman on a mission for the PERFECT wall decoration.  It is all paper (and a little bit of googly eyes and some string), and everything is Modge Podged down onto good old foam core.  Just like the little Monkey, it was a labor of love.  It makes me happy every time I see it :)

Tuesday, April 13, 2010

Fabric Organization

Happy Tuesday!  Today's tip is something that might be totally obvious to everyone else, but was a total light bulb idea for me.  Athough I'm soooooo not an experienced sewer, I've been reacquanting myself with my old sewing machine and I've been accumulating alot of fabric.  A little cotton here, a little burlap there, a clearance on something...before I knew it I had a mountain of fabric in my crafting space.  What to do with it all?  If I just fold it up and stash it away, I'll never remember what I have or how much of it.  Hmmm - what to do?  At the dollar store I saw a pack of baseball/football/whatever card sleeves.  Being the randomly addicted shopper that I am, I bought them and figured I'd use them to organize something.  And that something is fabric snippets. 


I've started taking a little snippet from each fabric and stuffing it into a sleeve with a little note of how much there is.  All the sleeves pop into a 3 ring binder and finally I can stash that mountain of fabric.  Now I have a quick and easy reference that I can thumb through or even take with me to match up coordinating fabrics!  Oh how I love things that make my life easier and more organized :)

LinkWithin

Related Posts with Thumbnails