
Sunday, May 30, 2010
Friday, May 28, 2010
BMT Panini
Happy Friday!! Now that we planted our garden, I have plenty of basil for my all time favorite summer sandwich - Basil, Mozzarella and Tomato Paninis. So simple, but sooooo good. Now we just need for those tomatoes to hurry up and ripen :)

Basil, Mozzarella and Tomato Panini
Ingredients
loaf of unsliced Italian bread, cut into 1 inch slices
2-3 large tomatoes, sliced 3/4 inch thick
large bunch of basil (or 3-4 leaves of basil per sandwich)
1 pound fresh sliced mozzarella (or 2 slices fresh mozzarella per sandwich)
butter
mayonnaise
fresh cracked pepper
Directions
- Preheat grill pan to medium-high heat
- Lightly butter one slice of bread and place butter side down on plate
- Lightly spread bread with mayonnaise
- Top mayonnaise with slice of mozzarella (or two), two slices of tomato, fresh cracked pepper (to taste)
- Add basil leaves and second slice of mozzarella
- Lightly spread second slice of bread with mayonnaise and place atop sandwich, mayo side down
- Lightly butter top of sandwich
- Gently place sandwich onto griddle pan and immediately top with panini press, large skillet or foil wrapped brick
- Let sandwich cook for 2-3 minutes until bread is golden brown and toasty
- Remove the press/skillet/brick and gingerly flip sandwich; Replace press/skillet/brick on this side
- Cook for another 1-2 minutes until golden brown
- Repeat Steps 2-11 for all sandwiches
Thursday, May 27, 2010
Duh!
Happy Thursday!! Uh oh, I didn't get a project done for today's post! I had actually planned on posting the awesome gift that I made for my in-law's 40th anniversary, but I just realized that I never took a picture of the finished project. Duh! So instead, please enjoy this lovely fish... and I promise to get with the program and use my camera (for other things than fish art)


Wednesday, May 26, 2010
What Ten Bucks'll Buy Ya
Happy Wednesday!! So back when there was still snow on the ground, I bought this King size sheet set from Walmart for $9.

Nine dollars people! Sure, we're not talking luxury linens here, but it is a whole lotta fabric for nine bucks. I did what anyone would do...I made a simple ruffle shower curtain and a valance for our bathroom. I couldn't have bought a shower curtain and valance at Walmart for $9 let alone have tons of fabric left over for all sorts of random projects.
This project could.not.be.easier. The only thing easier is buying a ready made curtain.
Step 1 - wrestle with your existing shower hooks and take down your current shower curtain
Step 2 - use your existing shower curtain as a template and cut out your new curtain. I used the top of the sheet (wide edge) as the top of the shower curtain for a little extra stability. I wanted to add a ruffle to the bottom, so measured up 4 inches to compensate for the new ruffle. And add 1/2 inch to the non-finished side to allow for the hem.

Step 3 - Cut the ruffle piece. Since the shower curtain used only about 3/4 of the sheet width, I just used the very bottom 3 1/2 inches (bonus, the hem is already finished)
Step 4 - Finish the cut edge. Fold...fold...pin...sew straight line
Step 5 - Ruffle and pin. I used a running stitch to lightly ruffle my strip. While pinning, I pinned both ends down and worked toward the middle to keep my ruffliness even.

Step 6 - Cut and finish holes for the shower hooks. I used my old shower curtain to mark the holes. I didn't take a picture of this step because I intend to add grommets, but I didn't have any in my stash....so, I just poked some holes for today ;)

I love how it brightens my little bathroom right up :)
Oh, and that valance...I used one of the pillow cases and just folded over an edge for my curtain rod. Stitched it up and called it done.

Tuesday, May 25, 2010
How Does Your Garden Grow
Happy Tuesday!! Last week we planted our garden. We have some woods behind our house that keep our back yard pretty shady. The only spot that gets all day sun is the driveway. Since the hubster was a little opposed to turning the driveway into a garden (weird, huh?) we opted to use a tiny little 12"x8' strip right against the house.

Technically this spot is indeed on the driveway, but off to the side. Since we have limited space, I opted to plant only the basics - tomatoes, peppers, zucchini and some lettuce. I also planted a bunch of herbs in some containers - rosemary, sage, cilantro, basil, thyme and chives.

Yum, yum, yum! With all these delicious fresh herbs right outside my kitchen door, I thought I'd peruse the blogworld to find some new recipes to try. Here's the first one that made me drool on my keyboard caught my eye ;)
Resturant-Style Salsa from Pioneer Woman (mmm, lots of Cilantro)
Now I just need to find a few for all those other yummy herbs!
Monday, May 24, 2010
Gone Fishin
Happy Monday! This week's Munchkin Theme is fishing. Last week I picked up a Melissa & Doug fishing puzzle (complete with pole) for the Munchkin and decided that this would be a perfect week for some fishin. Here's what we'll be diving into this week:
Letter of the Week: F
Creative, Crafty, Sensory Fun:
Letter of the Week: F
Creative, Crafty, Sensory Fun:
- F is for Fish letter craft
- Shape Fish collage
- Felt fishing game (I've been meaning to make this forever!)
- Fishing for puzzle fish
- Hello Fish: visiting the coral reef
by by Sylvia A. Earle
- Ordinary Amos and the Amazing Fish
by Eugenie and Henry Fernandes
- The Rainbow Fish
by Marcus Pfister
- One Fish, Two Fish, Red Fish, Blue Fish
by Dr Seuss
- The Pout-Pout Fish
by Deborah Diesen
- Bedtime Kiss For Little Fish
by Lorie Ann Grover
- Curious George Goes Fishing
by H. A. Rey, Margret Rey
- Fidgety Fish
by Ruth Galloway
- Row, Row, Row your Boat
- One Little, Two Little, Three Little Fishies
- Fish themed Muffin Tin lunch
- Fishy Jello Cups
- Goldfish Crackers!
Sunday, May 23, 2010

Saturday, May 22, 2010
Ooooh I'm Trendy :)
This award is from Kerri at The Pleasures of my life. Wow - thank you so much!!

And now I'm payin it forward. I love all of these blogs - if you've already gotten the award, well then you rock...if not, then feel free to share the award love...
http://oopsey-daisy.blogspot.com/- Mad craftin skillz!
The Thriftress - Thrifty, crafty geniusness!
http://whimages.blogspot.com/ - Absolutely gorgeous photographs!
http://whimsikel.blogspot.com/ - Amazingly cool craftiness!
http://funambulistdamsel.blogspot.com/ - Crazy creative awesomness!
Friday, May 21, 2010
Bananalicious Crumb Muffins
Happy Friday! If you haven't already guessed, I have a sweet tooth the size of Texas. When we have a few overripe bananas in the house (which is often), I whip up a batch of these yummies for breakfast. Because banana's are good for you right hehehe. I'm sure the the sugar crunch topping is totally neutralized by all the good stuff in the banana!

Bananalicious Crumb Muffins
Muffin Ingredients:
1 1/2 cup flour (all-purpose)
3 very ripe bananas, mashed
3/4 cup sugar
1 egg
1/3 cup butter, melted
1 teaspoon baking soda
1 teaspoon baking powder
1/2 teaspoon salt
Topping Ingredients
1/3 cup brown sugar, packed
2 tablespoons flour
1 tablespoon butter
Directions:
- Preheat oven to 375 and lightly grease 10 muffin cups or 8 mini loaf pans
- In a large bowl, mix together flour, baking soda, baking powder and salt
- In another bowl, beat together the bananas, sugar, egg and melted butter
- Stir the banana mixture into the dry ingredients until just moistened
- Spoon batter into prepared pan(s)
- In a small bowl mix the brown sugar and flour for the topping
- Cut in butter until mixture resembles coarse cornmeal
- Sprinkle topping over muffin batter
- Bake in preheated oven (18-20 minutes for muffins, 20-25 minutes for mini loaves) or until a toothpick inserted into the center of a muffin/loaf comes out clean
Thursday, May 20, 2010
Framed Butterfly
Happy Thursday!! Today's thrifty craft is a take-off of this gorgeous pillow that Disney over at ~Ruffles And Stuff~. I had a little Dollar Store frame that was in need of something (sorry, I can't seem to find a before picture of the frame - it was just basic wood toned). So I sprayed my little Dollar Store frame with a few coats of Heirloom White (ah spray paint, how I love you) and put it in my stash for a rainy day. Well let me tell you, the past few days have been rainy. So out came my little cream-alicious frame and with Disney's generous pattern, I cut a butterfly out of light blue felt and another one out of a scrap of pastel cotton and sewed them together (I ran a stitch around the edge and around the body of the butterfly):

(my appologies for the bad photo - it was dark and rainy)
And now for the assembly. I took a page from an old book (used for such projects) and cut it to fit in the frame. Then just a little dab of hot glue just on the butterfly body to attach it to the book page and viola:

It adds such a fun touch of whimsy to our end table :)
Wednesday, May 19, 2010
Peanut Butter & Felt
Happy Wednesday! Today's whateva is something that I just made for Mr Snugglepuss (nah, I don't think he'd answer to that). The little man loves peanut butter crackers; they're his favorite snack ever. And, he's starting to really like playing pretend - so much so that the other day he was spreading pretend peanut butter on a coaster and told me that he's making a snack. I've seen lots of felt food out there in bloggyland and decided to give something a try. My first attempt is a peanut butter cracker sandwich:


Oh I love felt! So easy to work with! I didn't take pictures along the way because, well I just wasn't thinking! I've only made pb cracker sandwich so far, but I was so excited with how it turned out that I had to share. If anyone's interested in an actual tutorial, let me know and I'll write one as I make the next sammich. I just hand-sewed everything and put a pinch of stuffing in the crackers and a little more in the blob of peanut butter. Snugopotamus likes that they come apart so that he can 'spread' the peanut butter. I think I might add a couple of dots of velcro to keep the sandwich together when he's not playing with it, but that's for another day ;)


Oh I love felt! So easy to work with! I didn't take pictures along the way because, well I just wasn't thinking! I've only made pb cracker sandwich so far, but I was so excited with how it turned out that I had to share. If anyone's interested in an actual tutorial, let me know and I'll write one as I make the next sammich. I just hand-sewed everything and put a pinch of stuffing in the crackers and a little more in the blob of peanut butter. Snugopotamus likes that they come apart so that he can 'spread' the peanut butter. I think I might add a couple of dots of velcro to keep the sandwich together when he's not playing with it, but that's for another day ;)
Tuesday, May 18, 2010
Is It Wrong to Love a Steam Mop?
Happy Tuesday!! So I generally hate cleaning. There are just so many other things that I could be doing besides cleaning! I could be playing with Mr Stinkopotamus... crafting something... cooking something... reading my never-ending list of blogs in Google Reader... So anything that makes cleaning easier (or more fun) is ok with me. A few months ago I ordered a Bissell Steam Mop like this:
Disclaimer - I was not paid, given anything or otherwise compensated to say nice things about this product. I just really really like it :)
Yeah, I didn't take a picture of mine. I might love it, but does it really need a spot on my camera card? I think not. So as I was rambling...most of my floors are hard wood. Pretty, yes. Fun to clean, no. I've been using this baby for a few months now and I seriously love it. The floors are squeaky clean and disinfected and it only takes my a half hour to do the whole house. Now, I will say that the manufacturer directions do mention that it could strip your floors. Ours are polyed and we use a rejuvinator on them a few times a year - I haven't noticed any stripping, but I'll defintely post about it if I do! Now if only I could find something that makes cleaning bathrooms fun!!
Disclaimer - I was not paid, given anything or otherwise compensated to say nice things about this product. I just really really like it :)
Monday, May 17, 2010
Green Thumb
Happy Monday! This week's Munchkin Theme is gardening. Here in the East, the temperatures are finally steady enough to plant our summer veggies and annuals. And since Munchkin is a dirt-magnet little boy, digging in the dirt is ALWAYS a good time. Here's a list of our green-thumb projects for this week:
Letter of the Week: V
Creative, Crafty, Sensory Fun:
Letter of the Week: V
Creative, Crafty, Sensory Fun:
- V is for Vegetable craft
- Potting our herb garden
- Planting veggies and plants in the garden
- Color hunt at the local nursery
- Painting garden rocks
- The Curious Garden
by Peter Brown
- Curious George Plants a Tree
by H.A. Rey
- Mortimer's First Garden
by Karma Wilson
- Number Garden
by Sara Pinto
- Growing Vegetable Soup
by Lois Ehlert
- The Carrot Seed
by Ruth Krauss
- Planting Veggies (sung to Frere Jacques)
- Digging up a Garden (muffin tin fun)
Sunday, May 16, 2010

Friday, May 14, 2010
Grilled Pizza
Happy Friday! Oh how I love Fridays. Friday's usually mean dinner out, family visits and lots of pre-weekend errands. But every so often, they mean a relaxed (well, as relaxed the little Tornado of Toys allows them to be) dinner at home with lots of playtime and no particular things to do or place to be. These are my favorite kind of Fridays (probably because they're so hard to come by!) For those delicious Fridays, I like to pull out my favorite pizza dough recipe and have the hubby grill it up (after I prebake the shell). There's something oh so yummy about a grilled pizza and an unhurried evening!
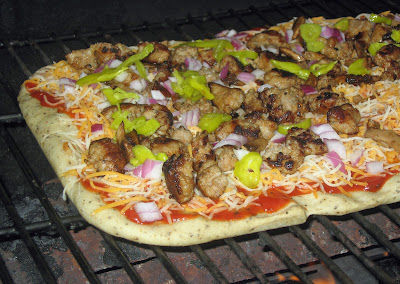
Grilled Pizza with Italian Sausage, Mushrooms, Onions and Pepperoncinis
Dough Ingredients:
3 cups all-purpose flour
1 (.25 ounce) package active dry yeast
3 tablespoons olive oil
1 teaspoon salt
1 tablespoon white sugar
1 + 1/4 cups warm water (110 degrees F/45 degrees C)
1/4 cup pepper (or to taste)
2 teaspoons garlic powder
Topping Ingredients:
2 Hot Italian Sausage links
1/4 cup mushrooms, chopped
1/4 red onion, chopped or sliced thin
3 tablespoons sliced pepperoncinis
1/2 cup your favorite pizza sauce
1 cup shredded Italian blend cheese
Directions For the Dough:
- Combine yeast with 1/4 cup water in a large mixing bowl and let stand for 10 minutes
- While yeast is proofing, combine sugar, salt, garlic powder and pepper
- After 10 minutes, add the flour, olive oil 1 cup water and spices to the bowl
- Mix/Knead dough for 10-12 minutes (I let my mixer do the work) - dough should be elastic and smooth
- Put dough in oiled bowl; Cover and let stand for 1 hour
- Divide dough in half (for this recipe we're only using 1/2 of the dough - the other 1/2 can be put in the refrigerator for a few days or in the freezer up to a month)
- Remove casing from sausages
- Add 1 tablespoon of olive oil to a pan over medium heat
- Add sausages and saute - break sausages apart as they cook
- After 5 minutes of cooking, add mushrooms and continue to cook until sausage is cooked through
- Remove from heat and set aside
- Preheat oven to 375 degrees
- Roll/Stretch dough into pizza crusts of desired thickness (I use jelly roll pans)
- Prick holes in the dough with a fork
- Prebake dough at 375 for 5-7 minutes
- Heat grill to medium
- Remove prebaked shells and top each with pizza sauce, cheese, sausage/mushrooms, red onion & pepperoncinis
- Gently transfer pizza to the grill using a large spatula
- Close the lid and grill until cheese is melted and crust is desired crispness (5-7 minutes)
- Remove from grill very carefully (I slide the pan back under it to remove) and enjoy
Thursday, May 13, 2010
Shabby Chic Initial
Helloooooo Thursday! Wow, where has this week gone? For this week's thrift craft, I give to you...a giant moss covered C. Still reading? Ok, so it is a big moss covered C, but its all shabby chic like and purdy. A little more interested? Ok then, read on fellow shabolicious reader :)


This story starts with a scrap piece of 1x10x7 and some oopsy paints from Lowes (thank you shopper who's paint was screwed up) I took the scrap piece of wood and painted it with two coats of a lovely red paint and then another two (very light) coats of a light grey-beige paint

Sorry, I forgot to snap a picture of the red coats - here she is with the grey-beige paint on top
Once she was all dry (actually, a few days) I took a piece of 180 grit sandpaper and went to town. I sanded down to the wood in a few places, but the goal was to just weather it and let some of that red paint show through, like so...

I bought a pretty big letter C a few weeks back at JoAnn's and was just waiting for inspiration to strike. Enter a little moss, a little hot glue...

And wham, bam hot glue gun Sam...I ended up with a happy shabby chic initial for my bookcases

I especially love it paired with the delicate look of the butterfly boxes. I'm sure the display on these bookcases is going to be ever-evolving, but I'm still trying to fill them up with things that I love right now.
Wednesday, May 12, 2010
Pretty Tiered Stand
Happy Wednesday! So, I mentioned that my sister is getting married in a few months. But I forgot to mention that my SIL is also getting married in a few months. Holy family weddings Batman! Because my SIL's shower is on the small side, we're hosting it at our house. Her wedding is in September and she's doing a fall theme. A few weeks ago I was in Walmart and spied the PERFECT melamine plates to make into tiered cookie servers. This little project could not have been easier:

Ahhh, I love it when a plan comes together ;)
- paint brassy candlestick holder from the Dollar store white (gloss finish)
- glue painted candlestick holder to bottom and top plate

Ahhh, I love it when a plan comes together ;)
Tuesday, May 11, 2010
Menu Planning Fun
Happy Tuesday! Whew, this is a late post - Sorry about that! So last week I mentioned how terribly BORING and haphazard our family's dinners had become. Time to pull myself back up by the apron strings and get back to meal planning! Sooo... here's what's for dinner at our house this week.
M - Grilled Chicken Sandwiches with Apricot Sauce (thank you Pioneer Woman!) and Crispy Fried Potatoes
T - Philly-icious Sloppy Joes
W - Grilled Pizza with Onions, Pepperocini's and Italian Sausage
T - BBQ Grilled Chicken with Pasta Salad
F - Grilled Burgers with Baked Potato Fries and Tomato Salad
S - Chicken Crescents (shout out to The Tidy Nest on who's blog I drooled saw this on) with a big salad
S - BBQ Ribs with corn and coleslaw (because who doesn't love a big mess!)
And since meal planning was on my mind, I also was on the lookout for some inspired meal planning tools, tips and ideas. Here's a wonderful round-up of what I found:
AMAZING magnetic recipe holder at Shanty 2 Chic
Cool framed chalkboard menu board at Home Sweet Home
Brilliant portable spice kit at Handy Hausfrau
Super organized weekly meal organization at Home Spun Threads
Monday, May 10, 2010
Anything Goes!
Happy Monday! We've been having a great time with our weekly Munchkin Themes, but this week I decided that we needed some 'anything goes' time. Here's a peek at our anything and everything fun:
Letter of the Week: G
Crafty Creative and Sensory Fun:
Letter of the Week: G
Crafty Creative and Sensory Fun:
- F is for flowers (one of my Mother's Day presents)
- Planting flowers
- Helping Daddy build a bed for our vegetable garden
- Watercolor painting/coloring/finger painting
- Making cookies with Mommy
- Whatever else might strike our fancy!
Sunday, May 9, 2010

Friday, May 7, 2010
Chocolicious Cheesecake
Happy Friday! Mmm chocolate cheesecake...need I say more? Here's my current favorite chocolate cheesecake recipe:

Chocolicious Cheesecake
Crust Ingredients:
3/4 package of oreos, crushed
3/4 stick of butter, melted
1/4 cup sugar
Cheesecake Ingredients:
3 packages cream cheese, at room temperature
4 oz semi-sweet chocolate
1 cup sugar
1 teaspoon vanilla
2 teaspoons espresso powder
3 eggs
Mouse Ingredients:
1 containuer Cool Whip, at room temperature room
1 box devils food instant pudding mix
1 package cream cheese, at room temperature
1/4 cup heavy cream
For the Crust:
- Mix oreos, butter and sugar
- Press into bottom and up the sides of springform pan
- Put pan in refrigerator until ready to pour in cheesecake filling
- Melt chocolate in a double boiler or in microwave, set aside to cool
- Preheat oven to 350 degrees and put in a shallow baking pan on the bottom rack to heat up
- Cream together cream cheese and sugar until smooth
- Add in chocolate and beat until incorporated
- Add in vanilla and espresso powder
- Beat in eggs one at a time until incorporated
- Remove pan from refrigerator and fill with cheesecake
- When oven is to temperature, pour two cups of hot water into the shallow pan on the bottom rack
- Bake cheesecake for 1 hour or until center is slightly jiggly and sides are set
- Allow cheesecake to cool in oven for two hours
- Beat cream cheese until smooth
- Add in cool whip and pudding mix and beat until incorporated
- Beat in heavy cream until mixture is thick, but spreadable
- Top cooled cheesecake with mouse and refrigerate for 4 hours or overnight
Thursday, May 6, 2010
Summer Decor Balls
Happy Thursday! Has anyone seen this awesome closeline at the Dollar Store? It was tucked away with the weird car/garage stuff at my store, but I sniffed it out.

Ok, maybe sniff is not the right word... It reminded me so much of that lovely bakers twine from Divine Twine. So I bought up a bunch of it in all of these delicious colors and set to work hot gluing said clotheline to styrofoam balls.

I love the end result - they're oh so fresh and summery. The blue ones in particular feel verynaughty nautical.
And if anyone is wondering (I'm sure all of you are on pins and needled...ha!) I'm totally procrastinating on my Mother's Day gifts. I'm a bad, bad little monkey!

Ok, maybe sniff is not the right word... It reminded me so much of that lovely bakers twine from Divine Twine. So I bought up a bunch of it in all of these delicious colors and set to work hot gluing said clotheline to styrofoam balls.

I love the end result - they're oh so fresh and summery. The blue ones in particular feel very
And if anyone is wondering (I'm sure all of you are on pins and needled...ha!) I'm totally procrastinating on my Mother's Day gifts. I'm a bad, bad little monkey!
Tuesday, May 4, 2010
My Baby's Book Bag
Happy Wednesday! Today's whateva is my new favorite bag - ever. Ok, so maybe I'm partial (since I did make it). Naaaah, it is that awesome ;) My little Stinkeroo and I go to the library at least once a week and we most often leave with an armful of books. A library bag has been on my to-make list for awhile and then I remembered about this post on MADE. Oooh baby, now we have a project!
I didn't take pictures all along the fusing process, because I followed Dana's directions. The only difference is that I used thinner bags from our grocery store, so it took 10 layers on a medium-high heat setting to fuse a nice sheet of plastic. Now I'm not gonna lie here - it is a PAIN in the butt to find just the right combination of plastic layers and heat, but once I had it down I rolled them off pretty quick.
I needed 3 pieces of fused plastic for this little bag. I wasn't terribly concerned with the exact size (especially since I was only making one) so my measurements are a little on the wonky side:
The letters printed from Word using Arial Bold in a 200 point font size. I printed them off, cut them out and used the paper as my pattern on the plaid fabric.
The measurement for the blue edge strips are two pieces at 9 1/2 x 2 and two pieces of 4 1/2 x 2. I simply folded the blue fabric over the edge and sewed a straight line across.
The pocket is 9 1/2 x 2 1/4. I added the blue rolled edge to clean up the edge. I like the frayed look on the top of the bag, but I didn't like it so much for the pocket (I'm weird, I know).
I didn't take pictures of each step, but here's a go at my process:


And for the record, the Munchkin will always be my baby :)
I didn't take pictures all along the fusing process, because I followed Dana's directions. The only difference is that I used thinner bags from our grocery store, so it took 10 layers on a medium-high heat setting to fuse a nice sheet of plastic. Now I'm not gonna lie here - it is a PAIN in the butt to find just the right combination of plastic layers and heat, but once I had it down I rolled them off pretty quick.
I needed 3 pieces of fused plastic for this little bag. I wasn't terribly concerned with the exact size (especially since I was only making one) so my measurements are a little on the wonky side:
- front and back measure 9 1/2 x 10 1/2
- sides measure 4 1/2 x 10 1/2
- bottom measures 9 1/2 x 4 1/2
- handles measure 11 x 1 3/4
The letters printed from Word using Arial Bold in a 200 point font size. I printed them off, cut them out and used the paper as my pattern on the plaid fabric.
The measurement for the blue edge strips are two pieces at 9 1/2 x 2 and two pieces of 4 1/2 x 2. I simply folded the blue fabric over the edge and sewed a straight line across.
The pocket is 9 1/2 x 2 1/4. I added the blue rolled edge to clean up the edge. I like the frayed look on the top of the bag, but I didn't like it so much for the pocket (I'm weird, I know).
I didn't take pictures of each step, but here's a go at my process:
- fuse plastic
- measure & cut all pieces from plastic
- measure & cut top edge strips, handle accents and pocket
- print letters and use paper letters as a pattern


- pin letters to front and sew them on
- pin pocket edge to pocket and sew on pocket
- run stitch up the center of the pocket to create 2 pockets
- pin blue edge strips to front, back and side pieces and sew
- pin handle lining to handles (right side out and top stitch) and sew
- in the center of each handle, fold in half lengthwise (plastic facing out) and stitch at the very center to make the handles more comfortable
- pin front piece to bottom piece and sew
- pin back piece to bottom piece and sew
- pin side to front piece and sew
- pin side piece to back piece and sew (this is where it does get a little tricky to hold everything together)
- pin side bottom to bottom piece and sew
- repeat steps 3 - 5 for the other side piece
- to add the handles, just pin on and top stitch in a square and then x the center for extra support (I used white thread for this to make it less noticeable)

And for the record, the Munchkin will always be my baby :)
Tipped Out
Happy Tuesday! Well, it's official - I'm all out of tips. My first reaction was to scour around a bit trying to dig up a tip to share, but um...that wasn't fun. Soooo I am waving the white flag of tipsiness and morphing Tuesday posts into more of a 'something I'm trying to make my life easier, more organized, less cluttered, etc.' kind of post. Lately I've been struggling in the dinner department. In the winter I'm generally pretty organized. I have a month+ of dinners (and even lunches) planned out and weekly shopping lists at the ready. Once spring hits its like my organized mind takes a vacation. I think eh, we'll grill something - but I stop planning what that something will be. Let me tell you, grilled chicken 4 days in a row is enough to drive you batty! As I was looking through my recipes, I realized that I had 2 that involve grilling - out of a bazilion. So something I'm trying this week...is collecting two weeks worth of grilling/summer recipes and mapping out dinners for the next two weeks (just like I do in the winter). I'm hoping this will take away my dinner anxiety and someday I'll be able to look at a piece of grilled chicken without twitching!
Monday, May 3, 2010
Projects!
Ever since the hubs and I have been together, spring marks the beginning of 'Project Season'. Now that we have a little Snugbug, he wants in on the project fun. He already has quite a tool collection, but last weekend Mimaw and Poppy brought over a Little Tikes circular saw, jigsaw and safety goggles. Let me tell you, nothing spells awesome like power tools! To celebrate this year's Project Season, this week we're having some tool-themed fun :)
Letter of the Week: T
Crafty, Creative, Sensory Fun:

Letter of the Week: T
Crafty, Creative, Sensory Fun:
- T is for Tools letter craft
- The Right Tool matching game (match the tool to the tool's action)
- Stomp-style tool makin music
- Lots of pretend building
- Tools
by Taro Miura
- Old MacDonald had a Woodshop
by Lisa Shulman
- Manny's Book of Tools
by Marcy Kelman
- Toolbox Twins
by Lola M. Schaefer
- Tool Book
by Gail Gibbons
- The Toolbox
by Anne and Harlow Rockwell
- Little Bunny's Cool Tool Set
by Maribeth Boelts
- Monkey with a Toolbelt
by Chris Monroe
- The Tool Song (to the Wheels on the Bus melody)
- This is the Way We Swing our Hammer

Subscribe to:
Posts (Atom)