Go into your Blogger Layout tab and decide where you would like the list of buttons to appear (in my case it was the left column), and select the [Add a Gadget] button:

Pick the Text Gadget from the pop-up list of basic gadgets:

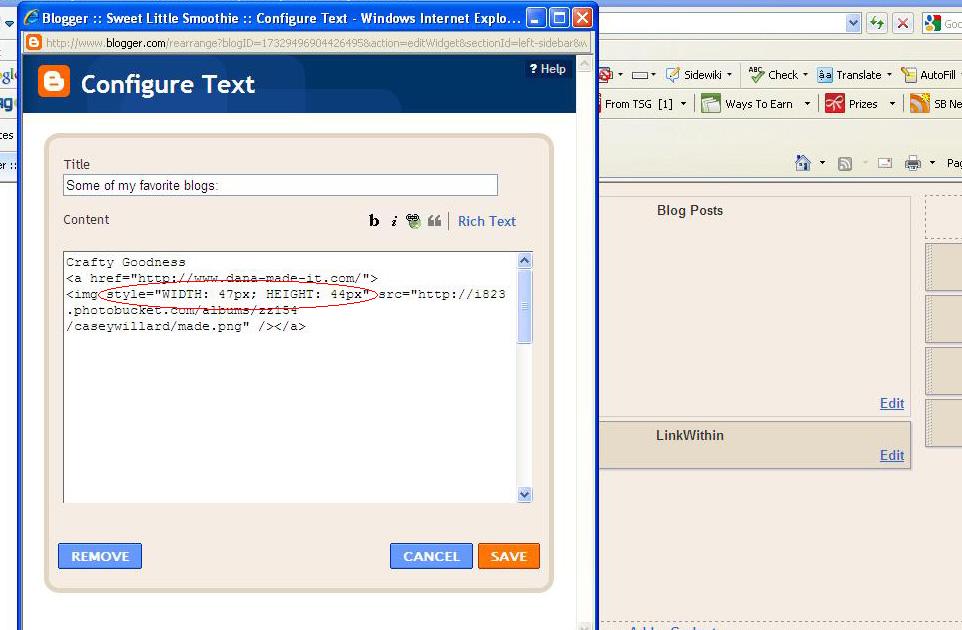
Enter the title of your list (for this example I'm building my list of favorite blogs) and enter any separating titles in the main body (since this is a favs list, I'm separating by type):

Now for the fun (and really, the most time consuming) part, building out the list of buttons. I had a mishmash of button links scattered throughout all of my posts. I just sat down over a few days and slowly copied them one by one into a Notepad txt file so that I would have my list all together. Toggle to the HTML view by selecting the Edit HTML link on the far right, under the Title (circled by red in the previous picture). For this example, I only have one button:

Now for the simple adjustment - all you need to do is add (or possibly change) a height and width size. First step is to look for an existing height and/or width specification in the
To view what the button will look like on your page, simply toggle back to the Rich Text view:

And here's what my button looks like on my blog:

(and seriously, who does not love Dana @ MADE?!?)
For any new link up parties, I simply edit the Gadget, add the new button and edit the height & width size...easy peasy :)
10 comments:
Thanks for the tute! All those screen shots must have taken forever, but this is very well-done!
WOW! GIrl, you are good! I love your clean-looking list... now I just have to track down all those HTML codes! Thanks.
Thank you so much. I found you on the Skip To my Lou "Made by you Mondays", this is so helpful. I just created my own blog a few weeks ago and am trying to get the hang of it. This will help, you have a new follower, thanks!
Terri
http://craftyworkinmommy.blogspot.com/
Thank you SO much! I just made over my blog buttons and am soooo grateful for this tutorial!! :) You're the best.
K, I linked to your tutorial today on my blog:
http://oopsey-daisy.blogspot.com/2010/05/bloggy-news.html
I just found your blog today and these really stood out to me! I was just about to contact you and ask how you did and and thought maybe I would look around and see if you already did a tute on it, WHICH YOU DID!!!! I found it very quickly, your nicely organized. Thank you so much for sharing the how to. I don't do linky partys as much as I should but this may motivate me to keep up on them!
I'll join the throng and thank you as well. This was incredibly helpful to someone like me who is intimidated by html. My blog posts look so clean and neat now without a bunch of huge buttons tacked onto them!
Hi I did this and blogged about it.
Great tutorial!
Thank you so much for the great tutorial! I am super excited it worked out! I never really blog about blogging, but I was so excited that I posted about it and linked to you...a few times! :)
http://addicted2tutes.blogspot.com/2011/05/blogging-tute-resizing-buttons.html
this helped me soooo much! Thanks!
http://caribbeanmissionarywife.blogspot.com/
Post a Comment